Now that the weather has finally become more autumn-like, I've been wearing my hand knit socks. It's so nice to have soft, warm socks to wear in the cooler temperatures, especially when I'm waiting for a bus in the early morning chill. Anyway, with all that sock wearing comes sock washing, and so the other day I gathered something like 7 pairs of socks to hand wash and hang to dry. I didn't hand wash the superwash socks - just the ones that I'm pretty sure are Not Superwash (note to self: knit more superwash socks for yourself). As I was putting the Koigu pair into the soak, I noticed a small hole on the heel, but it was half submerged when I noticed it, so I went ahead and put it all the way in. I'd rather darn a clean sock rather than a dirty one.

So once the sock had dried, I grabbed my darning egg and took a good look at the hole, which was a little bigger after washing than when it went in. There were a couple things going on: along the bottom of the hole, it appeared that one stitch had been dropped about three rows. Then I noticed that the yarn had broken above the dropped stitch in two rows. And lastly, the row above that had pulled itself out of two stitches. After looking at a few videos from the kind folks at Knit Picks, I decided that I would treat the hole in a similar way to their "accidental hole."

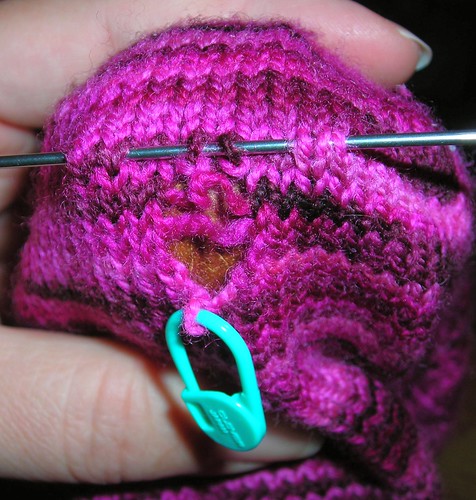
First thing first: I took care of the dropped stitch. In the photo, I have a size 000 double-pointed needle in the stitch and the yarn from where it was dropped above. I got it back up the three rows it had dropped and secured it with a locking stitch marker. I then used one of my tiny little dpns to secure the two stitches above the hole that had lost their buddies below. It's difficult to tell from the photo below, but those two fuzzy bits in the middle are the broken rows.
Next I threaded a finer tapestry needle with some of the yarn I had leftover from when I knit these socks (nearly two years ago!). Well to the right and below the hole, I began duplicate stitching to give myself a base for the new stitches I would have to make for the broken yarn. When I got to the part of the hole where I had to create new stitches, I used a dpn, rather than the Knit Picks method of having a thread to catch the new stitches on, because I thought I might be better able to see how to add the new stitches if it looked more like knitting than sewing. (I think if I do this again, I'll probably use the thread method, because it will curve around the darning egg.) Once I had the two new rows, I joined the new stitches to their friends up top and closed the hole. Then I duplicate stitched a couple more rows, just to make sure there was plenty of new yarn to secure the darning.

It doesn't look like the original heel, in fact it looks a little clumsy, but it's not bad for a first try at darning. It feels pretty good on my foot, and I think that as the sock is worn more and washed more, it will begin to feel less like a patch and more like a reinforcement. After all the duplicate stitching, I turned the sock inside-out to hide the ends and used one of my mom's tiny, tiny crochet hooks to pull the broken ends of the old yarn back to the wrong side of the fabric. I think it's ready to wear. I expect I'll soon have to more socks to darn as winter comes along, but I'm not scared! I've done this once now and I'm ready to do it again when I have to.

That's all for now, I think. Next time I'll show the finished FrankenScylla socks and maybe a new owl or two. Until then, Friends!